


There’s a moment in every 3D artist’s journey when things start to “click.” You stop fighting the software. Your models look cleaner. Your renders feel believable. Clients notice the difference. That shift doesn’t come from luck—it comes from mastering the right techniques.
3D modeling isn’t just about pushing vertices around. It’s about structure, efficiency, visual storytelling, and understanding how digital objects behave in real-world lighting and physics. Professionals don’t rely on random tutorials. They follow proven workflows.
In this guide, we’ll break down 7 powerful techniques pros use in 3D modeling—from topology fundamentals to rendering finesse. Whether you’re working in Blender, Maya, 3ds Max, Cinema 4D, or another modeling software, these principles apply universally.
Why 3D Modeling Skills Matter More Than Ever


Today, 3D modeling powers:
- Video game development
- Animated films
- Visual effects (VFX)
- Product visualization
- Architectural rendering
- Industrial design
- Virtual reality (VR)
- Augmented reality (AR)
- 3D printing
- Metaverse environments
High-quality 3D models are no longer optional. They are the foundation of digital production pipelines.
Let’s dive into the techniques that separate amateurs from professionals.
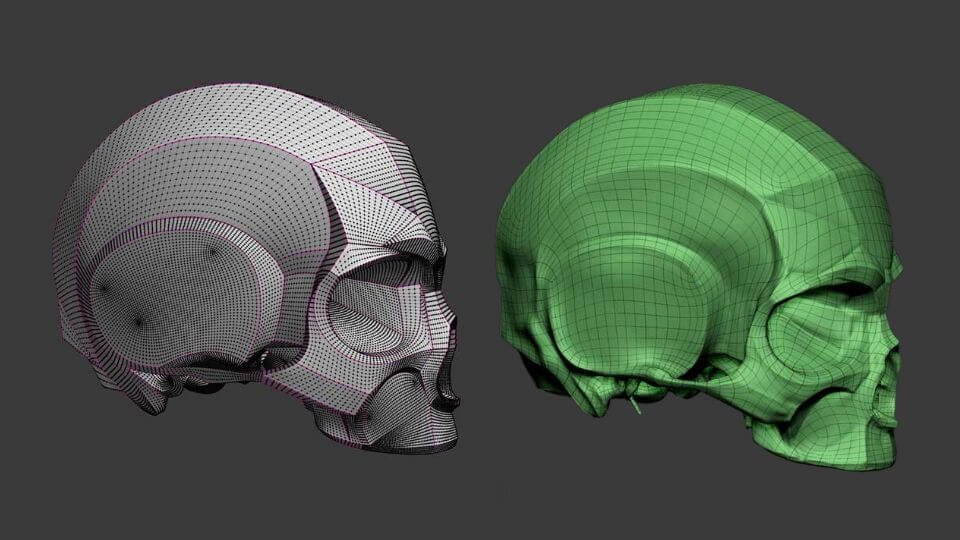
1. Master Clean Topology for Professional Results
If there’s one rule in 3D modeling that professionals never ignore, it’s clean topology.
What Is Topology?
Topology refers to how polygons, edges, and vertices are arranged in a 3D mesh. Good topology ensures:
- Smooth deformations
- Proper shading
- Easy UV mapping
- Clean subdivision
- Efficient animation
Pro Tip: Use Quad-Based Modeling
Professionals prefer quad topology over triangles or n-gons. Quads subdivide predictably and support smoother edge flow.
Key principles:
- Maintain even polygon distribution
- Avoid unnecessary edge loops
- Use edge flow to support form
- Reduce poles in high-deformation areas
Clean topology makes your 3D modeling process faster and more flexible later.
2. Block Out Before Adding Detail
Beginners often jump straight into fine details. Professionals don’t.
They start with blocking—a low-poly base mesh that captures proportions and silhouette.
Why Blocking Matters
- Establishes scale and balance
- Prevents proportion errors
- Speeds up iteration
- Keeps design flexible
In 3D modeling, the silhouette is more important than micro-details. If the form doesn’t work from a distance, no amount of texture detail will save it.
Workflow Example
- Start with primitive shapes (cube, sphere, cylinder)
- Adjust proportions
- Refine major forms
- Add secondary shapes
- Apply fine details last
This structured modeling workflow reduces rework.
3. Use Reference Like a Pro
Professional 3D modeling artists rely heavily on reference images.
Even experienced designers use:
- Orthographic views
- Real-world photography
- Blueprint references
- Material samples
- Anatomy studies
Why Reference Improves Accuracy
Our brains fill in gaps inaccurately. Reference corrects assumptions.
For example:
- Real-world objects have subtle asymmetry
- Surfaces contain imperfections
- Edges are rarely perfectly sharp
Incorporating reference into 3D modeling improves realism instantly.
4. Understand Lighting While Modeling
Lighting isn’t only for rendering. It influences modeling decisions.
Professionals test their models under different lighting setups to check:
- Surface smoothness
- Hard edge transitions
- Shading artifacts
- Normal direction issues
The Clay Render Test
A common 3D modeling technique is applying a neutral clay material and rotating studio lights around the object. This exposes flaws quickly.
Lighting reveals what wireframes can’t.
5. Master UV Mapping and Texturing
A beautiful model can fall apart with poor UV mapping.
What Is UV Mapping?
UV mapping flattens a 3D mesh into 2D space for texturing.
Professional 3D modeling includes:
- Minimizing texture stretching
- Strategic seam placement
- Maintaining consistent texel density
- Packing UV islands efficiently
PBR Workflow
Physically Based Rendering (PBR) is industry standard. It includes maps like:
- Albedo (Base Color)
- Roughness
- Metallic
- Normal
- Ambient Occlusion
- Height or Displacement
Understanding material creation transforms basic 3D models into realistic assets.
6. Optimize for Performance
Not every 3D model is meant for cinematic rendering. In game development and VR, optimization is critical.
Professionals focus on:
- Polygon count management
- Level of Detail (LOD) creation
- Efficient edge loops
- Texture resolution balancing
- Normal map baking
High Poly to Low Poly Workflow
- Create high-resolution sculpt
- Retopologize into clean low-poly mesh
- Bake normal and detail maps
- Apply optimized materials
This workflow ensures performance without sacrificing visual quality.
7. Refine with Subdivision and Edge Control
Subdivision modeling is a core technique in professional 3D modeling.
How Subdivision Works
It smooths a mesh by adding geometry.
To maintain sharp edges, pros use:
- Support loops
- Bevel modifiers
- Crease tools
- Weighted normals
The secret isn’t just adding subdivisions—it’s controlling them.
Common Mistake
Adding too many edge loops early can make models difficult to edit. Instead, refine progressively.
Core 3D Modeling Tools Comparison
Here’s a quick overview of popular software used in professional 3D modeling:
| Software | Best For | Strength |
|---|---|---|
| Blender | All-in-one modeling & animation | Free & powerful |
| Maya | Animation & film production | Industry standard |
| 3ds Max | Architecture & game assets | Strong modeling tools |
| ZBrush | Sculpting | High-detail organic modeling |
| Cinema 4D | Motion graphics | Easy learning curve |
Each platform supports core 3D modeling principles like topology control, UV mapping, and rendering.
Advanced Techniques Pros Use
Once fundamentals are strong, professionals go deeper.
Procedural Modeling
Using modifiers and node-based systems to create dynamic, non-destructive models.
Hard Surface Modeling
Common in product design and sci-fi assets. Focuses on mechanical precision, chamfers, and panel lines.
Organic Sculpting
Used for characters and creatures. Emphasizes anatomy knowledge and surface detailing.
Kitbashing
Combining pre-made assets to speed up 3D modeling workflows in concept art and environment design.
Common 3D Modeling Mistakes to Avoid
Even talented artists fall into these traps:
- Overcomplicating meshes
- Ignoring scale reference
- Skipping retopology
- Poor edge flow in joint areas
- Overusing smoothing
- Neglecting render tests
- Rushing UV unwrapping
Recognizing mistakes accelerates improvement.
Building a Professional 3D Modeling Workflow
Here’s a simple professional pipeline:
- Research & Reference Collection
- Blocking Base Mesh
- Refining Forms
- Clean Topology Adjustment
- UV Mapping
- Texturing (PBR workflow)
- Lighting Setup
- Rendering & Post-Processing
- Optimization (if needed)
- Portfolio Presentation
Consistency matters more than speed.
Why 3D Modeling Is a Long-Term Skill
Unlike trendy tools, 3D modeling fundamentals do not change quickly.
Software evolves. Techniques refine. But core principles—proportion, topology, lighting, texture realism—remain constant.
That’s why professionals invest time mastering basics instead of chasing shortcuts.
Final Thoughts
3D modeling is both technical and artistic. It demands precision, patience, and problem-solving. The seven powerful techniques we explored—clean topology, blocking, reference use, lighting awareness, UV mastery, optimization, and subdivision control—form the backbone of professional work.
If you apply these consistently, your models will improve noticeably.
The difference between average and exceptional 3D modeling isn’t talent. It’s structured practice and disciplined workflow.


